Building a bridge between ML and Cyber with a development environment
 Image credit: DALL-E openai
At the beginning of our journey to ML and cybersecurity, we need to lay the foundations for a good development environment that fits our needs. This is the tale of three different environments: Google Colaboratory (Colab), Jupyter Server launched from your terminal, and VS Code. In addition, we will discuss essential topics for development environments, such as handling secrets securely with Jupyter and pyenv to manage multiple Python versions.
Table of Contents
This blog is longer than the rest of the series. You do not have to read all parts since you can pick one development environment and can drill into that. The ToC below will help you read only what you need.
1,000 ft View
Let’s quickly review the development environments where we will be writing ML software that solves cybersecurity problems.
Why?
Even though there are several tools and platforms that embed ML, such as Elastic, Datadog, and Splunk, they still have a lot of limitations in how you can handle your data. Nothing is more adaptable and versatile than the code you created based on your requirements.
I personally use my development environment for experimentation whenever I can. Specifically, I use local development for data exploration, modeling, and feature engineering. Then I deploy a known platform for scaling and ML operations. It pays off in the long run to have your own custom scripts, and they are reusable in multiple projects.
The ML development environment is different from what most security professionals use. It centers around Jupyter notebooks, a quick way to run code, look at the numbers, and visualize with graphs all in the same window.
What?
I suggest three options, depending on your time and the effort you want to put in:
- Google colab: takes the least amount of time to set up and is the least flexible.
- Terminal, favorite editor, and Jupyter Server: medium amount of time, flexible, not a significant productivity boost. The links reference my favorite terminal, Terminator, and editor, Vim (and now, let the editor wars begin… Vim vs. Emacs).
- VS Code: takes the most amount of time to set up, offers unlimited flexibility and a productivity boost with plugins for remote work and collaboration (ssh plugin, Live Share), and even code generation (CodeGPT).
How?
The diagram shows you the roadmap for each environment, with links on how to set it up. If you want to hear about my experience setting up, keep reading! I have added links to the diagram so that you can get to the part that you would like and skip the rest if you do not want to read pros and cons and have already made your decision.
- Development Environment
  - [Google Colab](https://colab.research.google.com/)
    - Create account
    - [Install packages in Colab](#install-packages-in-colab)
    - [Colab options](#colab-options)
  - Terminal + Editor + Jupyter
    - [Virtual Environments](#virtual-environments)
    - [IPython](https://ipython.org/)
    - [Jupyter](https://jupyter.org/install)
  - VS Code
    - Extensions
        - [Python](https://marketplace.visualstudio.com/items?itemName=ms-python.python)
        - [Jupyter](https://marketplace.visualstudio.com/items?itemName=ms-toolsai.jupyter)
    - [Setup Jupyter virtual env](#troubleshooting)
A Tale of Three Development Environments
This is an interesting story for me. I most recently started using Google Colab to share code from my talks. My actual first development environment was a terminal and editor. After I moved to VS Code, I never looked back.
Google Colaboratory (Colab)
Colab is straightforward to set up and use. You need to have a Google account, and that is just about it. There is a set of resources to get you started.
I have created an example, hello_colab.ipynb. The example imports the necessary library, then creates and manipulates dataframe, an artifact that looks like a spreadsheet, from one of the most popular ML libraries, Pandas. We will talk a lot about Pandas in future posts. All you have to do is hover on top of a cell and add new code cells with your code. You can also add markdown text. The functionalities of Colab Notebooks are the same as Jupyter Notebooks. See the image below on how to add Code, Text (Markdown), and how to run your cell.
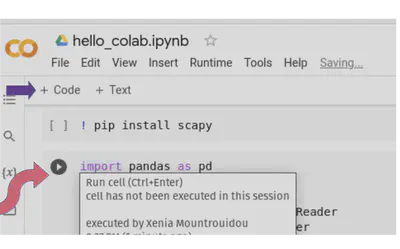
Install packages in Colab
How do you install a package? Here is an example in my notebook:
! pip install scapy
As you can see, the syntax is the same as when you install Python packages on your system; just add a “!” at the beginning of your command. Make sure to perform the necessary pip installations before your imports.
Colab options
A few more basic things that will be important for a data project are:
-
You can upload files for analysis by clicking on the file icon on the left. There is a limit to the file size (13 MB) if you do not have a paid account. This is a big limitation with Colab: files are lost after you stop the runtime. So you have different options:
-
Mount your Google Drive with data
-
Download your data from external sites (Github, Kaggle). Here is an example colab notebook where you have both options to mount the Google Drive or download from a public Github repository.
Runtime options:
- Sometimes you need to restart your script; use “Runtime Restart.”
- Use “Interrupt Execution” if the script runs too long (infinite loop?).
- You can change your runtime to use some GPUs with “Change Runtime Type.”
Tools:
- The “Command Palette” has useful options, such as “Ask a question on stack overflow.”
- Use the settings if you want to connect your account to GitHub. The rest of the menus are pretty self-explanatory, like sharing files on Drive and all that jazz.
That’s it. You are now ready to do some data science experiments quickly and without much setup.
The good, the bad, and the ugly
The benefits of using Colab are that you do not have to manage the basic ML Python packages (you still have to install some packages), you do not have to manage a virtual environment for Python, it has GPU setup, and live collaboration as well as sharing is seamless. As you noticed, Colab is quick to setup, and the learning curve to use it is not steep. In my opinion, these are the biggest advantages.
There are caveats, though:
- You need an internet connection to work on Colab. I like to work on the plane, and that is not optimal.
- It is not as easy to use datasets, such as files; you cannot just save them locally. You either have to mount your Google Drive or use external APIs and SDKs to get your data. I have shared an example colab notebook with methods to get data from Github and mount your Google Drive.
- It does not integrate with Git; at least as far as I have used it, I have not found a way to work with repos and version control. There is a Colab Pro version that I have not used, so this may do the trick.
Personally, I prefer having the option to develop locally and, even more importantly, customize everything. That is why I do not use Colaboratory much. Needless to say, if you do not have time to set up anything else for your ML, Colab is an excellent solution.
Your favorite editor + terminal + Jupyter
As I mentioned, this was my first development environment. A Vim editor and a terminal. This may be your existing environment, and therefore the only thing I can add are two recommendations:
- Use a Python virtual environment.
- Use
IPythonwhen you need to run small script parts, as I will provide lots of those in my blogs. - Use Jupyter for ML experimentation.
Let’s see how to improve your terminal and editor environments.
Virtual Environments
A virtual environment is a sandbox where all your installed Python packages live. But why not just use pip install my_fav_package in your host environment? Besides making me really sad, you need to think carefully about what you are doing when installing all these packages on your main system. What if there is a version conflict? What if you actually need to use an older version of a package or even a different version of Python in a project? This is particularly common with ML packages. When you use virtual environments, you have nice, organized boxes with your packages and their versions. So let’s make the world a better place and use virtual environments.
All you need to do is execute the following command in the directory where your project will be:
$ cd my_project
$ python -m venv .venv
The above will create a virtual environment named .venv. I add this to my .gitignore. Then activate your environment:
$ source .venv/bin/activate
(.venv)$
That’s it. You have saved yourself a lot of pain and suffering. Then install your packages in this environment:
$ pip install pandas
One optional step is to save your packages in a file called requirements.txt, then use them on any computer:
$ pip freeze > requirements.txt
Then, if you change computers, go to your project, activate the virtual environment and reinstall:
$ cd my_project
$ python -m venv .venv
$ source .venv/bin/activate
(.venv)$ pip install -r requirements.txt
These are “Cliff’s notes” on Python virtual environments. I strongly recommend Python Virtual Environments: A Primer. It is a comprehensive guide to the beauty of virtual environments.
IPython
You will need to run code snippets for data analysis. I recommend IPython because it has great features such as tab completion:
# go to your project directory
$ cd my_project
# activate your virtual environment
$ source .venv/bin/activate
# install IPython
(.venv)$ pip install -r ipython
# get into the interpreter
(.venv)$ ipython
Python 3.10.6 (main, Oct  2 2022, 18:56:28) [GCC 11.2.0]
Type 'copyright', 'credits' or 'license' for more information
IPython 8.5.0 -- An enhanced Interactive Python. Type '?' for help.

In [1]:
Did you know IPython is a kernel for Jupyter Notebooks?
Jupyter notebooks
Now that you have proper virtual environments for your packages, you can install Jupyter Notebooks and use them in combination with an editor. A Jupyter notebook is the Swiss army tool for a data researcher. It can give the opportunity for quick demonstrations, run small parts of your code to experiment, and visualize with graphs all in the same window. Here is how you install and launch JupyterLab:
# install
pip install jupyterlab
# launch
jupyter lab
The JupyterLab will automatically recognize your preferred browser and launch. Similarly, you can install just notebooks:
# install
pip install notebook
# launch
jupyter notebook
In this case, you will see the classic Jupyter notebook launch in your browser.
VS Code
VS Code is a versatile IDE. I strongly recommend it because of the plugin ecosystem that it provides. I also recommend installing trusted plugins, since, as with any software, there may be malicious ones that can ruin your day. There are plugins for git, intelligent code completion, remote collaboration, appearance customization, and, of course, ChatGPT. All these enhance your productivity and improve the programming experience. Using VS Code does have a learning curve at first, but in my opinion, the benefits are worth it.
Download and install VS Code, then install the Python and Jupyter extensions.
After you install these two extensions, create a new project and notebook. Let’s name it hello_jupyter.ipynb. Then, you know the drill, open a terminal, and get your virtual environment setup:
$ python -m venv .venv
$ source .venv/bin/activate
(.venv)$ pip install pandas
# don't forget to save the packages
(.venv)$ pip freeze > requirements.txt
Let’s create a cell and test if our Jupyter notebook can see the virtual environment based on the animation below.

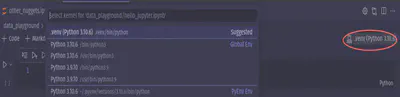
You may need to select the virtual environment manually. The figure below highlights how to select the environment in your Jupyter notebook:
Troubleshooting
VS Code may not recognize your virtual environment immediately. Here is how to actually install the kernel for it manually:
# Activate the virtualenv
$ source .venv/bin/activate
# Install jupyter in the virtualenv
(.venv)$ pip install jupyter
# Add the virtualenv as a jupyter kernel
(.venv)$ ipython kernel install --name "local-venv" --user
After all this, you may need to restart VS Code and/or your Jupyter kernel using the restart button at the top menu of your notebook:
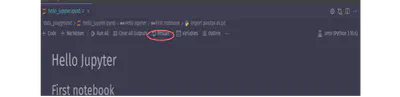
Your local-venv name is .venv or whichever name you used when you created your Python virtual environment.
Advanced Topics
You will find more resources in the end; however, I wanted to discuss a couple of important other topics here.
Storing your secrets securely
If you are a security professional, you want to write secure code. One of the biggest “no-nos” is to store hard-coded secrets in your code. You can bypass this problem with environment variables and the Python library python-dotenv.
First, you need to install the package:
# activate your virtual env
source .venv/bin/activate
pip install python-dotenv
# save the new package
pip freeze > requirements.txt
Then use it to load secrets in your notebook:
from dotenv import load_dotenv

# finds .env file and loads the vars
load_dotenv()
openai_api_key = os.getenv("OPENAI_API_KEY", "Key not found")
The variable openai_api_key stores the secret key. The key is found in a .env file with the following syntax:
OPENAI_API_KEY='xyz'
Do not forget to add .env to your .gitignore file so that you do not upload your secrets to any public server.
Pyenv
Sometimes you may need to use code from old projects that use Python 2.x or some other version of Python that is not your global installation. This is where pyenv comes in handy. You can have local Python versions for your project and a global Python version, all managed neatly by pyenv. This RealPython article walks you through the installation and how to use it.
Recap
Now you have a development environment that fits your needs. I am sure that you cannot wait to use it. In the next post, we will do exactly that: retrieve security data, then use our favorite development environment to analyze it.
– Xenia
Going Even Deeper
- Comprehensive blog for VS Code setup: Getting Started with VS Code
- Moare recommended plugins from my favorites:
- Smart coding & productivity
- Markdown
- Markdown all in one
- Marp presentations with markdown
- Jupyter Slide Show
- Make your VS Code pretty
- Poetry
- Jupyter